Leatherwork Tutorial: Smaug Dragon from The Hobbit
- Feb 16, 2016
- 4 min read

I first read The Hobbit when I was in highschool as part of a book report assignment. I had picked a piece of paper out of a box and randomly got assigned to write a report on the novel. Complete chance had introduced me to one of my favorite authors of all time, J.R.R. Tolkien. The Hobbit was my first step into reading countless fantasy novels, and my first encounter with different fictional races like dwarves, elves, orcs and goblins. But hands down, my favorite character in the book has always been the dragon Smaug. The original wyrm that countless others would be based upon. So naturally, when I heard Peter Jackson (director of the Lord of the Rings trilogy) was taking on the immense project of The Hobbit movies, I couldn’t wait to see how Smaug would look.
I was completely blown away with his character design. The team at the WETA Workshop never ceases to amaze me with the amount of detail they pour into everything. They even cast Benedict Cumberbatch as the voice of Smaug, so of course I had to make some leather fan art for my beloved dragon.
This tutorial will cover how to dye leather, more specifically how to dye tooled leather. We won’t be making leather handbags, or dying leather jackets. Here, There Be Dragons. I will save the tutorial of how I carved Smaug into the leather for another blog post.
What You Will Need:
I used Fiebing’s Leather Dye (Red, Light Brown, and USMC Black), Fiebing’s Dye Reducer, and also Tandy Leather Factory’s Eco-Flo Leather Dye (Scarlet Red and Sunshine Yellow) for this project. For the finish, I used Fiebing's Acrylic Resolene, and Fiebing’s Antique Finish Paste (Mahogany) to highlight the swivel knife cuts. You can get all of these from Tandy Leather Factory, except the Antique Paste, that you can find fairly easily online. Tandy also makes their own antique gel, but I prefer the Fiebings. It doesn’t seem to stain my work, and just sits in the swivel knife cuts and impressions like it should.
To start off your dye process, take a scrap from the same hide your tooled piece came from and test out your dyes. I make several mixes, from a light mix to a dark mix to see what shades I will end up with. Let the scraps dry out, so you can see what colors you will end up with on your finished piece. Always test your dyes before you put them onto your tooled project. There is nothing worse than making a beautiful tooled piece, and have it ruined because you thought that shade of red would look more like a rusty color, and instead you ended up with Fire Engine Red. Smaug would not approve, and neither would I.

I started off dying the base colors with a light mix (about 4 parts dye reducer to 1 part dye) of red and washed in the areas of the dragon to get the mid tones down. Most leather dyeing is done Light to Dark. You can always make something darker, but you can’t lighten it back up if you make a mistake.
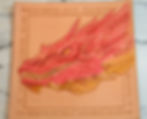
Next I added some yellow to the bottom of his neck. The yellow is fairly light to begin with, so I used it full strength out of the bottle. After it dried a bit, I came back in with some touches of light brown to start to enhance the shadows on his neck. The light brown was also added inside his mouth, between his teeth, and dabbed here and there around the eye. Most of the effort is really repetition of dabbing the browns around in the shadowy areas of his horns and around his eyes and nose until I was satisfied with the 3D effect. That laid in the groundwork for the heavy shadows I would be doing with the USMC Black.
Here I started working on the background as well, using layers of the light brown until I was satisfied with the color. I also got out some gold acrylic paint, and put a couple coats on the border where the Dwarven Runes are. (Recognize the runes fellow geeks? They are right out of the novel. They are on the map that leads Thorin Oakenshield and his company to the secret door that they must find on the last light of Durin’s Day. They start on the bottom left corner and continue around counterclockwise) In this picture you can see the first stages of the black leather dye coming into play. I’m fairly cautious with the black, since it is so dark. I use a dry brush with as little dye on it as possible so it won’t leak into areas I don’t want it in.

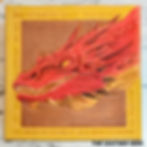
Above is the completed dye job, right after I sealed it with a mix of Acrylic Resolene and water (50%/50%). I do two coats of finish, and let the whole thing dry overnight to make sure it sets properly. The next day I use a dauber and the Antique paste and rub the paste briskly into the impressions and cuts. Then take a paper towel (and sometimes a Q-tip) and brush off the tops/peaks of the impressions to get the excess antique paste off. You only want the paste to settle in the crevices of your tooling. This will highlight all that hard work you did with the swivel knife and your stamps. Let that dry overnight as well, and lightly buff off any remaining paste with a paper towel. Then apply another coat of Acrylic Resolene over the whole thing and voila! Finished!
The Antique really makes the whole thing POP. You can now see all the little scales and wrinkles I carved individually by hand.
Smaug isn’t just another piece of art that I will hang upon my wall, he will also be my entry into the Southwest Leatherworkers Trade Show leather carving contest, which will be held at the end of February 2016 in Prescott Arizona. The Show is put on by the Leather Crafters and Saddlers Journal which is a great resource for any leatherworker, beginner or expert. I love reading the news articles and the “How To” patterns are great. I hope to write an article for them sometime, and possibly get featured in their journal!
Well that’s all for this leather dye tutorial. Be sure to check my shop for new and exciting leather geek gifts for the literary loved one in your life!
Until next time, Get Your Geek On!
Corey Christopher (The Leather Geek)


